
Acquainting one's self to the physical medium of film (as opposed to tape or digital video) can be a confusing and intimidating process. Thankfully, our fellow film student Aerlan Barrett has written what we feel to be a comprehensive and easily understood introduction and guide to using the Bolex camera. Though your particular model or circumstance may be unique, this guide will surely be of help.
---
Exposure
-This guide is specifically for understanding the Bolex. However, before you understand the mechanics of the camera, you must understand the mechanics of light and exposure.
A properly exposed image is variable and subjective, something that takes years of practice and creativity to master, but the concepts and basics of exposure are simple. An exposure refers to the amount of light that strikes a piece of film for a period of time, and then leaves an image. If you let the light strike for too long the film becomes white, or overexposed. If it strikes the film for too little time the film stays black, or underexposed. Proper exposure requires the correct amount of light to strike the film for the correct length of time.
There are 3 primary camera elements that affect the camera’s exposure. Aperture, ISO/ASA, and Shutter Speed. Aperture is the width of the opening of the lens that allows light to enter the camera, which is measured in F-stops. ISO/ASA is the sensitivity of the film to light; higher ISO stocks like 400 or 800 have larger grain/particles that are more sensitive to light. Because it takes less time to expose them, high ISO film is referred to as fast film. Slower film, or film with lower ISO, has smaller particles/grain and takes more light to expose. Finally, shutter speed refers to the length of time that light is allowed to burn its image onto the film. It is measured by fractions of a second. In motion pictures this can typically only be adjusted by going faster, because the camera must photograph at 24fps to create a filmic look. This rule can be broken, however, if you decide to photograph at less than 24fps, allowing a slower shutter speed.
The best analogy for imagining exposure is filling a bathtub with water, the bathtub being your film and the water being light. You need to fill the bathtub up near the very top without overflowing, but while still putting enough water into the tub. The amount of water that can flow in at once is determined by the size of the nozzle that the water comes out of (this is like the aperture on a lens). With a wider nozzle (or smaller F-stop) it allows more water to rush through the pipe (or lens) and into the tub; with a smaller nozzle (or larger F-stop), less water/light will be able to enter into the tub. The length of time you allow the water to pour into the tub influences this as well. If you have a small nozzle (or smaller F-stop), the water must be given more time to fill the tub (like using a longer shutter speed), but if you have a large nozzle you might only need to turn it on for a short period of time (a faster shutter speed.) The ISO/ASA (or sensitivity to light) would be the size of the bathtub. A large bathtub takes longer to fill (like a smaller ISO or slower film), and a smaller bathtub fills much quicker (higher ISO or faster film).
Exposure becomes tricky when you have highly contrasting light in the same frame; a good example of this is shooting from indoors out of a window. In this case there’s often no right answer for exposure because exposing for the bright light outside of the window will make the inside of the room darker (or underexposed) while exposing for the inside of the room will make the windows blown out (or over exposed.) In circumstances like these other factors like filters, gels, and lights become critical to obtaining a desired exposure. Once you master the mechanics of the camera, the settings become much less critical. What becomes more important is the manipulation of light being photographed.
Angular Shutter
-The camera has an angular shutter, which has a number of functions.
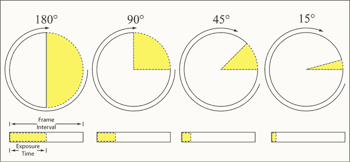
These values are measured in degrees because, depending on how many frames per second are being photographed, the shutter speed in seconds changes. For example, a 180-degree shutter at 24 fps has an exposure time of 1/48 of a second, however, a 180-degree shutter at 12 fps is 1/24 and a 180-degree shutter at 48fps has an exposure time of 1/96. As you can see, simply referring to exposure by its seconds value becomes confusing,
When calculating unusual angles, and/or fps, use this formula:
Exposure time (shutter speed) = (1/speed in fps) x (Angle of shutter opening/360)
The Bolex’s Variable shutter allows for the operator to photograph with a variety of exposure lengths, but also allows for the operator to fade to black in camera. This is achieved simply by closing the shutter completely (zero degree shutter) while photographing.
Overview
-The Bolex is a completely mechanical camera, powered by a hand-cranked motor that can run for up to 30 seconds. It uses 16mm film and can be converted to shoot Super 16. It was first manufactured in the 1930s, with new models still being released. Exposure
-This guide is specifically for understanding the Bolex. However, before you understand the mechanics of the camera, you must understand the mechanics of light and exposure.
A properly exposed image is variable and subjective, something that takes years of practice and creativity to master, but the concepts and basics of exposure are simple. An exposure refers to the amount of light that strikes a piece of film for a period of time, and then leaves an image. If you let the light strike for too long the film becomes white, or overexposed. If it strikes the film for too little time the film stays black, or underexposed. Proper exposure requires the correct amount of light to strike the film for the correct length of time.
Read More
There are 3 primary camera elements that affect the camera’s exposure. Aperture, ISO/ASA, and Shutter Speed. Aperture is the width of the opening of the lens that allows light to enter the camera, which is measured in F-stops. ISO/ASA is the sensitivity of the film to light; higher ISO stocks like 400 or 800 have larger grain/particles that are more sensitive to light. Because it takes less time to expose them, high ISO film is referred to as fast film. Slower film, or film with lower ISO, has smaller particles/grain and takes more light to expose. Finally, shutter speed refers to the length of time that light is allowed to burn its image onto the film. It is measured by fractions of a second. In motion pictures this can typically only be adjusted by going faster, because the camera must photograph at 24fps to create a filmic look. This rule can be broken, however, if you decide to photograph at less than 24fps, allowing a slower shutter speed.
The best analogy for imagining exposure is filling a bathtub with water, the bathtub being your film and the water being light. You need to fill the bathtub up near the very top without overflowing, but while still putting enough water into the tub. The amount of water that can flow in at once is determined by the size of the nozzle that the water comes out of (this is like the aperture on a lens). With a wider nozzle (or smaller F-stop) it allows more water to rush through the pipe (or lens) and into the tub; with a smaller nozzle (or larger F-stop), less water/light will be able to enter into the tub. The length of time you allow the water to pour into the tub influences this as well. If you have a small nozzle (or smaller F-stop), the water must be given more time to fill the tub (like using a longer shutter speed), but if you have a large nozzle you might only need to turn it on for a short period of time (a faster shutter speed.) The ISO/ASA (or sensitivity to light) would be the size of the bathtub. A large bathtub takes longer to fill (like a smaller ISO or slower film), and a smaller bathtub fills much quicker (higher ISO or faster film).
Exposure becomes tricky when you have highly contrasting light in the same frame; a good example of this is shooting from indoors out of a window. In this case there’s often no right answer for exposure because exposing for the bright light outside of the window will make the inside of the room darker (or underexposed) while exposing for the inside of the room will make the windows blown out (or over exposed.) In circumstances like these other factors like filters, gels, and lights become critical to obtaining a desired exposure. Once you master the mechanics of the camera, the settings become much less critical. What becomes more important is the manipulation of light being photographed.
Angular Shutter
-The camera has an angular shutter, which has a number of functions.
It allows the operator to change the shutter speed of each image that is being photographed. Since motion pictures usually must photograph at 24 frames per second (fps), exposure time becomes limited. Unlike still photography, where one could photograph anywhere from 1/5000 of a second to 30 minutes, motion picture (specifically and especially the Bolex’s) shutter speed can only be measured in increments of degrees. This is because in order to mechanically photograph anywhere from 8-64 fps, the mechanism works as a spinning wheel. Every 360 degree rotation of the wheel constitutes one frame. So the rate of rotation changes for the desired number of frames (spins) per second. Therefore, if the camera photographs at 24 fps, then the wheel rotates 24 times. A portion of the wheel is exposed to allow light to touch the film, and exposure is calculated by the degree of circle that is open to allow light in. As you can see above, with a 180 degree shutter half the time the circle is open allowing light to enter. Whereas a 90 degree shutter lets light in for a quarter of the time during its 360 degree rotation on each frame.
These values are measured in degrees because, depending on how many frames per second are being photographed, the shutter speed in seconds changes. For example, a 180-degree shutter at 24 fps has an exposure time of 1/48 of a second, however, a 180-degree shutter at 12 fps is 1/24 and a 180-degree shutter at 48fps has an exposure time of 1/96. As you can see, simply referring to exposure by its seconds value becomes confusing,
When calculating unusual angles, and/or fps, use this formula:
Exposure time (shutter speed) = (1/speed in fps) x (Angle of shutter opening/360)
The Bolex’s Variable shutter allows for the operator to photograph with a variety of exposure lengths, but also allows for the operator to fade to black in camera. This is achieved simply by closing the shutter completely (zero degree shutter) while photographing.
Bolex’s Problem
-Although it has an angular shutter, the Bolex doesn’t actually photograph 1/48th of a second with a 180* shutter (or if the lever on the side was completely up).
This is for a few reasons. The first is because the Bolex doesn’t actually have an exact 180 degree shutter; it is in fact more like a 170 degree shutter. The Bolex is a reflex camera, which means that the viewfinder reflects through a prism an image the goes straight through the lens into the viewfinder.
The principles of reflex photography are best explained with those of still photography, which can then be applied to the Bolex. In still photography, reflex cameras are the most common because while photographing the subject it is best to look through the lens for composition, focus, and depth of field. However, when the film is being exposed to light the still camera’s viewfinder is blocked so no light from the viewfinder clouds the film. When it comes to still photography this is rarely a problem and is only a slight irritation during long exposures.
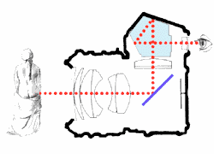
*if the dotted line is the light entering through the lens from the left, you can see how the viewfinder is seeing a reflection of the light through the lens, but when the shutter opens how the viewfinder is blocked so light isn’t lost.
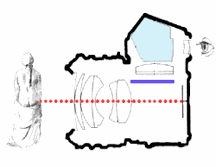
However with motion picture this would remove the point of the viewfinder, because an image would not be seen if the viewfinder was blocked while every frame is exposed. The solution for the Bolex is to allow for a certain amount of light to be lost through the viewfinder in order to be able to see what is being composed. As a result of the light loss through the viewfinder. the 180 degree shutter, or rather 170 degree, is in effect much closer to 110 degrees.
Besides this loss of a stop of light in speed, viewfinder light loss produces a few other results. The first is that when the aperture of the lens is stopped down and light is reduced, it is also reduced in the viewfinder. This means that darker exposures can be difficult to see through the viewfinder. However, this can be helpful: If you feel like the viewfinder is looking especially dark, check your exposures because there may be something wrong. The other issue with having a reflex viewfinder is that light can leak in through the viewfinder and cloud the film. The solution to this is to either block off the viewfinder with a small lever on the camera, or to make sure your eye doesn’t leave the viewfinder so that no light can get through.
With all of these factors taken into account, a Bolex at 24fps photographs at a shutter speed of 1/80th of a second.
Frames Per Second
-The Bolex can photograph anywhere from 8 fps to 64 fps.
This is effective because it allows the operator to photograph slow motion as well as fast motion. Since a projector will always project the image at 24 fps, filming more or less than 24fps will either compress or expand the action on screen. For example, if one were to photograph 48 frames per second then every second of action would have double the number of photos (frames) taken. When projected at 24 frames per second, the 1 second of action would be prolonged to 2 seconds, making each second appear to occur in slow motion. The opposite is also true: if one were to photograph 12 fps, then project at 24 fps, the 2 seconds of real time would occur in one second of projection, making it appear in fast motion.
When calculating exposure with the Bolex just remember that doubling/halving the Frame rate doubles/halves the amount of light let into the camera. This means that it is as simple as adjusting by a stop of light. If your aperture is 2.8 at 24 fps, then at 48 fps it should equal 2.0 and at 12 fps should equal 4.0. You can also calculate half stops if photographing at 18 fps, or 36 fps.
The easiest way to work is to calculate your exposure always at 1/80th and then adjust from there.
Single frame
-The Bolex is able to photograph a single frame at a time.
This can come in handy for animation or time lapse photography. For example, you can record a frame every 15 minutes throughout the day and on film the sun will rise and set within 4 seconds.
The automatic single frame exposure for the Bolex records it at what would be 12fps. The exposure time, in seconds, is 1/40th.
Note: it is advised to close your viewfinder when photographing single frames since it is not as necessary and risks clouding your film.
Exposing for Angular Shutter
-The same principle as exposing for varying frame rates applies to shutter.
If you desire to photograph at 90 degree shutter, expose it first for 1/80th and then adjust mathematically. If you were to record 5.6 at 180 degree shutter or (1/80 th), then 90 degree shutter or (1/160th) is 4.0.
On the lever the bolex reads ½, and then red. The red line is the 90 degree line (a full stop) and the ½ is the 135 degree line (a half stop).
Multiple Exposures
-Two of the main benefits of the camera are its frame counter and the ability to rewind the camera. This allows you to do multiple exposures.
Practically, it is very simple: You read the frame counter, which is on the top right of the side of the camera, and prepare your shot by spinning it to zero. Shoot your shot. First, make sure to pull your shutter down to zero degrees (or the lever completely down) to make sure you don’t re-expose your film as you rewind it. Write down the number of frames your at on your counter. Turn off the motor (with the lever on the centre of the bolex), initiate the motor, which should do nothing because you’ve turned it off, then insert your rewinder and manually rewind the film back to the zero mark (which should be the beginning of your shot that you set with the counter). Then, photograph your second exposure up to the number of frames you recorded at the end of your first shot.
Multiple exposures, or superimpositions, work by laying one layer of light on top of another. If you were to take two perfectly exposed shots and expose them over the same strip of film, they would combine to make one over exposed image. Because of this, when you make a double exposure you need to photograph each image with half the normal amount of light, so together they make a properly exposed image. Luckily, each stop works to halve or double the amount of light, so all one needs to do is under expose each image by one stop. The simplest way to do this, and the one often suggested, is to instead adjust the shutter to be 90 degrees and simple measure each exposure properly at 1/80th, and then do the multiple exposures.
Other effects
Hand crank
You can also photograph with the hand crank, and not use it just as a rewind effect. You can turn off the motor; pull the trigger and hand crank your film for an early-era movie effect.
Matte box/split screen
You can use a matte box to create a split screen effect with the same principles as a multiple exposure, but instead of layering two full images, block half the frame, photograph at a normal exposure, rewind, and place the screen on the opposite side.
On set check list
Because so much can go wrong here’s a checklist of things to do before every shot. Get someone to remind you of these regardless of whether you know you’ve already done it; you’ll be surprised at what you’ll forget in the heat of the moment and these are the things you must, must check.
1. Aperture
Did you set it for this shot already, or do you still have the old one? Is it set for the right point in the frame? If the light is changing, then do an extra reading right before you do the shot.
2. Focus
Is your eye right? Check to make sure what you want to be in focus is in focus, and check your diopter before shooting/switching cameramen. More importantly, measure! Use measuring tape to measure from the subject of the shot to the line on the camera where it is being photographed, not to the front of the lens (there is an indicator for the correct place to measure to for that reason). Also, check your depth of field with a chart to see how accurate you need to be. Remember that the farther the object is away from the camera the less accurate you need to be with focus, however if they’re close to the camera it is absolutely necessary!
3. Shutter
Is your shutter down? Is it at 90 degrees? One quick way to check is visible in the viewfinder: a pin that will point up when the shutter is completely down. If you see that, fix it! Remember that the lever should always be pointing up. Also remember to lock it by pushing it into the camera so it doesn’t accidentally get bumped down while shooting.
4. FPS
Are you photographing at 24 frames per second? Do you want it to be different? Make sure to check this, especially if you’re shooting slow motion for some of the shoot.
5. Eye on the viewfinder
Make sure your eye doesn’t come off of the viewfinder; one glance off of the finder can cloud and ruin a beautiful shot. Keep light out of that viewfinder.
-Aerlan Barrett
-Although it has an angular shutter, the Bolex doesn’t actually photograph 1/48th of a second with a 180* shutter (or if the lever on the side was completely up).
This is for a few reasons. The first is because the Bolex doesn’t actually have an exact 180 degree shutter; it is in fact more like a 170 degree shutter. The Bolex is a reflex camera, which means that the viewfinder reflects through a prism an image the goes straight through the lens into the viewfinder.
The principles of reflex photography are best explained with those of still photography, which can then be applied to the Bolex. In still photography, reflex cameras are the most common because while photographing the subject it is best to look through the lens for composition, focus, and depth of field. However, when the film is being exposed to light the still camera’s viewfinder is blocked so no light from the viewfinder clouds the film. When it comes to still photography this is rarely a problem and is only a slight irritation during long exposures.
However with motion picture this would remove the point of the viewfinder, because an image would not be seen if the viewfinder was blocked while every frame is exposed. The solution for the Bolex is to allow for a certain amount of light to be lost through the viewfinder in order to be able to see what is being composed. As a result of the light loss through the viewfinder. the 180 degree shutter, or rather 170 degree, is in effect much closer to 110 degrees.
*As you can see, the Bolex viewfinder is much more complicated, but works off of the same principle.
Besides this loss of a stop of light in speed, viewfinder light loss produces a few other results. The first is that when the aperture of the lens is stopped down and light is reduced, it is also reduced in the viewfinder. This means that darker exposures can be difficult to see through the viewfinder. However, this can be helpful: If you feel like the viewfinder is looking especially dark, check your exposures because there may be something wrong. The other issue with having a reflex viewfinder is that light can leak in through the viewfinder and cloud the film. The solution to this is to either block off the viewfinder with a small lever on the camera, or to make sure your eye doesn’t leave the viewfinder so that no light can get through.
With all of these factors taken into account, a Bolex at 24fps photographs at a shutter speed of 1/80th of a second.
Frames Per Second
-The Bolex can photograph anywhere from 8 fps to 64 fps.
This is effective because it allows the operator to photograph slow motion as well as fast motion. Since a projector will always project the image at 24 fps, filming more or less than 24fps will either compress or expand the action on screen. For example, if one were to photograph 48 frames per second then every second of action would have double the number of photos (frames) taken. When projected at 24 frames per second, the 1 second of action would be prolonged to 2 seconds, making each second appear to occur in slow motion. The opposite is also true: if one were to photograph 12 fps, then project at 24 fps, the 2 seconds of real time would occur in one second of projection, making it appear in fast motion.
When calculating exposure with the Bolex just remember that doubling/halving the Frame rate doubles/halves the amount of light let into the camera. This means that it is as simple as adjusting by a stop of light. If your aperture is 2.8 at 24 fps, then at 48 fps it should equal 2.0 and at 12 fps should equal 4.0. You can also calculate half stops if photographing at 18 fps, or 36 fps.
The easiest way to work is to calculate your exposure always at 1/80th and then adjust from there.
Single frame
-The Bolex is able to photograph a single frame at a time.
This can come in handy for animation or time lapse photography. For example, you can record a frame every 15 minutes throughout the day and on film the sun will rise and set within 4 seconds.
The automatic single frame exposure for the Bolex records it at what would be 12fps. The exposure time, in seconds, is 1/40th.
Note: it is advised to close your viewfinder when photographing single frames since it is not as necessary and risks clouding your film.
Exposing for Angular Shutter
-The same principle as exposing for varying frame rates applies to shutter.
If you desire to photograph at 90 degree shutter, expose it first for 1/80th and then adjust mathematically. If you were to record 5.6 at 180 degree shutter or (1/80 th), then 90 degree shutter or (1/160th) is 4.0.
On the lever the bolex reads ½, and then red. The red line is the 90 degree line (a full stop) and the ½ is the 135 degree line (a half stop).
Multiple Exposures
-Two of the main benefits of the camera are its frame counter and the ability to rewind the camera. This allows you to do multiple exposures.
Practically, it is very simple: You read the frame counter, which is on the top right of the side of the camera, and prepare your shot by spinning it to zero. Shoot your shot. First, make sure to pull your shutter down to zero degrees (or the lever completely down) to make sure you don’t re-expose your film as you rewind it. Write down the number of frames your at on your counter. Turn off the motor (with the lever on the centre of the bolex), initiate the motor, which should do nothing because you’ve turned it off, then insert your rewinder and manually rewind the film back to the zero mark (which should be the beginning of your shot that you set with the counter). Then, photograph your second exposure up to the number of frames you recorded at the end of your first shot.
Multiple exposures, or superimpositions, work by laying one layer of light on top of another. If you were to take two perfectly exposed shots and expose them over the same strip of film, they would combine to make one over exposed image. Because of this, when you make a double exposure you need to photograph each image with half the normal amount of light, so together they make a properly exposed image. Luckily, each stop works to halve or double the amount of light, so all one needs to do is under expose each image by one stop. The simplest way to do this, and the one often suggested, is to instead adjust the shutter to be 90 degrees and simple measure each exposure properly at 1/80th, and then do the multiple exposures.
Other effects
Hand crank
You can also photograph with the hand crank, and not use it just as a rewind effect. You can turn off the motor; pull the trigger and hand crank your film for an early-era movie effect.
Matte box/split screen
You can use a matte box to create a split screen effect with the same principles as a multiple exposure, but instead of layering two full images, block half the frame, photograph at a normal exposure, rewind, and place the screen on the opposite side.
On set check list
Because so much can go wrong here’s a checklist of things to do before every shot. Get someone to remind you of these regardless of whether you know you’ve already done it; you’ll be surprised at what you’ll forget in the heat of the moment and these are the things you must, must check.
1. Aperture
Did you set it for this shot already, or do you still have the old one? Is it set for the right point in the frame? If the light is changing, then do an extra reading right before you do the shot.
2. Focus
Is your eye right? Check to make sure what you want to be in focus is in focus, and check your diopter before shooting/switching cameramen. More importantly, measure! Use measuring tape to measure from the subject of the shot to the line on the camera where it is being photographed, not to the front of the lens (there is an indicator for the correct place to measure to for that reason). Also, check your depth of field with a chart to see how accurate you need to be. Remember that the farther the object is away from the camera the less accurate you need to be with focus, however if they’re close to the camera it is absolutely necessary!
3. Shutter
Is your shutter down? Is it at 90 degrees? One quick way to check is visible in the viewfinder: a pin that will point up when the shutter is completely down. If you see that, fix it! Remember that the lever should always be pointing up. Also remember to lock it by pushing it into the camera so it doesn’t accidentally get bumped down while shooting.
4. FPS
Are you photographing at 24 frames per second? Do you want it to be different? Make sure to check this, especially if you’re shooting slow motion for some of the shoot.
5. Eye on the viewfinder
Make sure your eye doesn’t come off of the viewfinder; one glance off of the finder can cloud and ruin a beautiful shot. Keep light out of that viewfinder.
-Aerlan Barrett
0 comments:
Post a Comment